DIY Owl Rice bags
This is the first time I have shared a pattern so bear with me. I am hoping you can understand and use my pattern! I made these rice bags for everyone on my list last year, including my husband. They are especially nice for kids when it is cold outside, just heat them up in the microwave for about one minute, add an essential oil of choice, I like lavender to help them sleep. And they can take them to bed with them, helps them to stay warm and cozy. The heat is also good for growing pains or any other discomfort they may have!
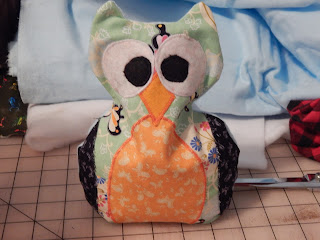


Here he is all done!

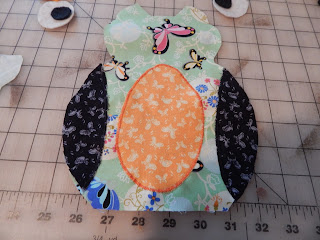
First I lay it all out to see how I want it to look.

Then I put the wings and belly on with a zigzag stitch.

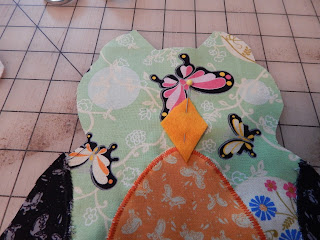
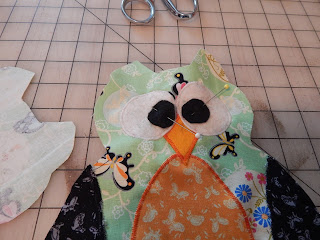
I then add the beak.

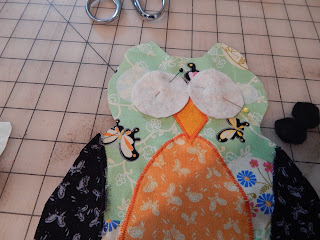
And the eyes.

Next the pupils.

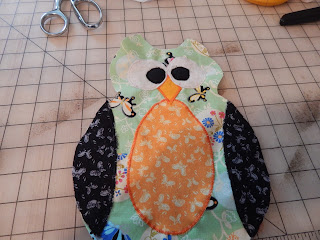
And here he is with all of the applique done!

Then he gets stitched up with a quarter inch seam, clipped and turned right side out.

Here is the back.

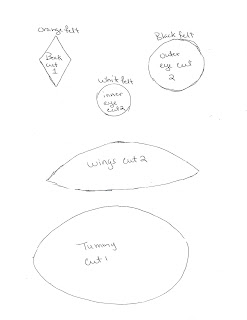
This is the body, cut two of these out of cotton or flannel. I make the fronts out of pretty cotton prints and the backs out of flannel so they are nice and soft!

Here are the parts. The eyes and beak are cut out of felt. The tummy and wings I cut out of cotton.
You are going to cut the patterns out and add your tummy, wings, eyes and beak before you sew the front and back together. I pin the body parts onto the fronts and applique them by machine. Then you sew the front to the back right sides together and leave the bottom open for adding the rice. Clip seams if desired, if I am sewing for a small child I sew around it twice to reinforce the seams, turn right side out and use a funnel to add your rice. I like mine floppy so I add just enough rice to give them some shape, about 3 cups. You could also add some dried lavender to give it some scent. When you have the desired amount of rice, use a needle and thread to sew the bottom shut or take it to your sewing machine and use a zigzag stitch to close it up. And there you have it a quick and easy gift!
Blessings,
Anna
Blessings,
Anna
Comments
Post a Comment